

Most heat-transfer vinyl (HTV), including designs cut on a Cricut, can be peeled off a shirt without ruining it. For most cotton and cotton-blend tees, the safest first move is gentle heat applied from the back of the fabric, followed by a slow, low-angle peel. That combination lifts the adhesive without scorching fibers or bleaching the dye underneath.
Before you touch an iron or a bottle of rubbing alcohol, run through this order of operations:
- Check the fabric care label and patch-test on an inside seam.
- Pick a low-heat technique first (iron or hair dryer) if the fabric can handle it.
- Peel slowly at a shallow angle, reapplying heat to any section that resists.
Skipping the patch test is the single most common reason people end up with a shirt that’s worse off than when they started. High heat or aggressive solvents can discolor, melt, or stretch fabric, and this damage is permanent once it happens. Older or screen-printed designs sometimes won’t lift at all, no matter how careful you are.
Work in a ventilated room if you plan to use any solvent, wear gloves, and never use acetone on synthetic fabric.
Pro Tip: If you’re not sure whether a design is HTV or screen print, try lifting one corner with a fingernail before doing anything else. Vinyl lifts. Screen print just smears.
Key Takeaways
Removing vinyl from a shirt works best with a patch test first, then heat and a slow peel, saving solvents and mechanical force for stubborn or older designs.
| Point | Details |
|---|---|
| Patch test first | Test heat or solvent on an inside seam before touching the actual design. |
| Heat is the safest starting point | Hair dryer or iron with a barrier cloth lifts most fresh HTV on cotton fabric. |
| Match solvent to fabric | Save acetone for cotton only; use isopropyl alcohol or Goo Gone on blends and synthetics. |
| Freeze old, brittle vinyl | A 1 to 2 hour freeze cracks aged HTV that resists heat and scraping. |
| Wash and wait before re-pressing | Launder thoroughly and let the area dry about 24 hours before applying a new design. |
Table of Contents
- Which Vinyl Removal Method Should You Try First?
- What You Need Before You Start
- How Do You Remove HTV With Heat and a Slow Peel?
- What Chemical Removers Actually Work on Vinyl?
- Can You Freeze or Scrape Vinyl Off Instead?
- How Do You Clean Up Leftover Adhesive Residue?
- What Mistakes Ruin a Shirt During Vinyl Removal?
- When Should You Call In a Professional Instead?
- What Do Experienced Menders Wish They’d Known Sooner?
- Why We Recommend the Conservative Approach
- Frequently Asked Questions
- Sources
Which Vinyl Removal Method Should You Try First?
The right method depends on three things: what the shirt is made of, what kind of vinyl is on it, and how long it’s been pressed. There’s no universal fix here. Fabric type and vinyl type both change the calculus, and getting this wrong is how people end up with a bleached patch where a design used to be.
Run through this checklist before picking a method:
- Is the fabric heat-safe? Cotton tolerates iron and hair dryer heat well. Polyester, spandex, and rayon blends scorch or glaze much faster.
- What kind of vinyl is it? Standard HTV lifts with heat. Adhesive-backed sticker decals often respond better to cold. Screen print doesn’t peel at all.
- How old is the application? Fresh HTV (pressed within the last few months) peels easier. Vinyl that’s been through a dozen wash cycles gets brittle and may need freezing or a solvent soak instead of more heat.
Here’s a rough mental matrix to work from: HTV on cotton means heat first. HTV on polyester means a hair dryer on low, or a small solvent test, since a hot iron risks melting the fabric itself. Sticker-style vinyl decals usually respond best to freezing or a cold peel. Screen-printed ink should not be attempted at all.
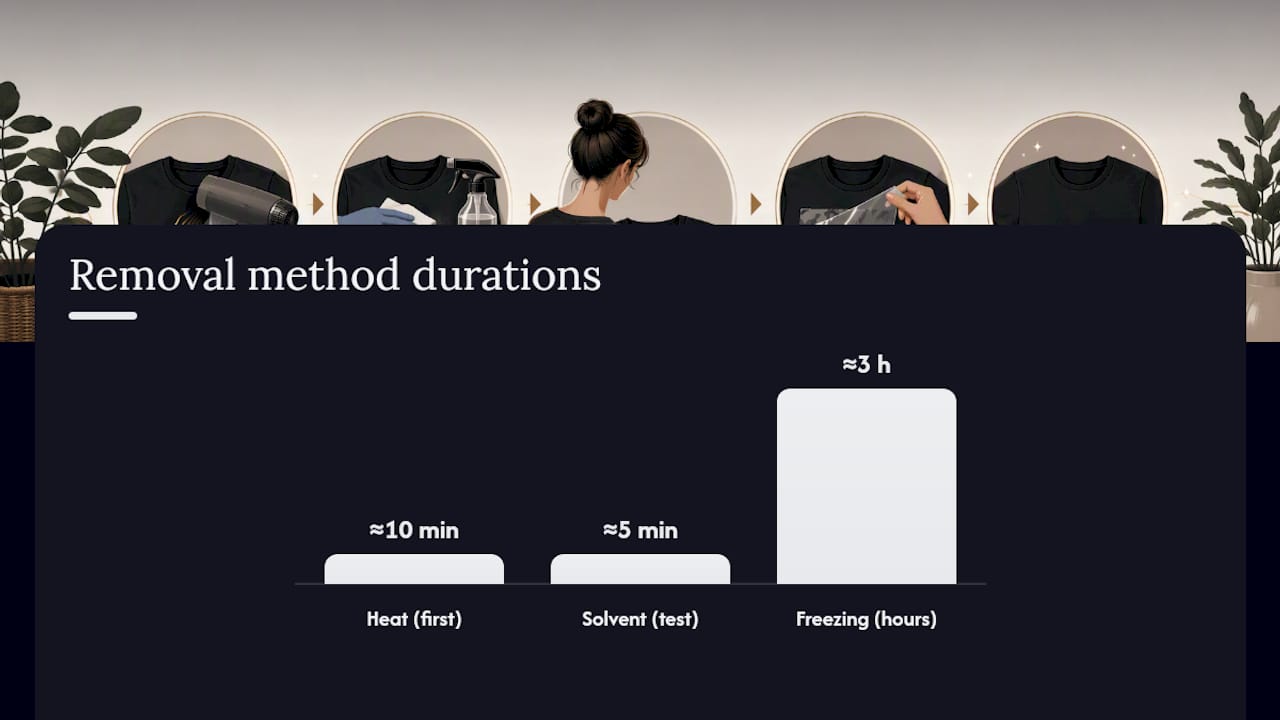
Timelines vary by method. Heat and slow peeling usually take several minutes per design. Freezing requires a few hours in the freezer before you touch it. A solvent soak may take a few minutes, depending on how stubborn the adhesive is.
Before committing to any method, try the fingernail test: slide a nail or a pair of tweezers under one edge of the design. If it lifts even slightly, you’re dealing with vinyl. If it doesn’t budge and the ink seems bonded directly into the fibers, it’s almost certainly screen print, and no amount of heat or solvent will separate it cleanly.
What You Need Before You Start
Gathering the right tools upfront saves you from stopping mid-peel to dig through a junk drawer. Here’s what a reasonably stocked removal kit looks like:
- A heat source: iron, heat press, hair dryer, or heat gun
- Tweezers or a weeding tool for lifting small edges
- A plastic scraper or an old credit card
- Isopropyl rubbing alcohol, 90% or higher
- Goo Gone or a citrus-based adhesive remover
- Acetone or nail polish remover (cotton fabrics only)
- A commercial letter remover like Stahls’ LRV, if you’re working on something valuable
- Gloves, clean cloths, cardboard or parchment paper, and a lint roller
Ventilation matters more than people expect. Solvents like acetone and citrus removers give off fumes that build up fast in a small bathroom or laundry room. Work with a window open, keep bottles capped when not in use, and store anything flammable away from an iron or heat gun.
Run the patch test before anything else:
- Pick a spot on an inside seam or hem that won’t show if it goes wrong.
- Apply the exact heat or solvent you plan to use on the design, using the same duration and setting.
- Check for color bleed, stiffness, shrinkage, or any change in texture.
- Only move on to the actual design if the seam looks and feels normal.
Slide a piece of cardboard or parchment paper inside the shirt before you start. It protects the back layer of fabric from adhesive bleed-through and gives you a firm surface to peel against instead of a floppy one.
How Do You Remove HTV With Heat and a Slow Peel?
Heat softens the adhesive layer holding vinyl to fabric, which is why it’s the go-to first method for most HTV designs. Here’s the sequence that works for most cotton and cotton-blend shirts:
- Turn the shirt inside out.
- Slide cardboard or parchment paper between the front and back layers.
- Apply heat to the back of the design area, since treating it from behind lets heat and solvent reach the adhesive layer directly instead of fighting through the printed top layer.
- Flip the shirt right-side out and test one corner of the vinyl with tweezers.
- Peel slowly at a shallow angle, roughly parallel to the fabric, not straight up.
- If it resists, stop pulling, reheat the spot, and try again.
Rough timing: a hair dryer on high needs about 45 to 60 seconds held close to the fabric. A heat gun works faster, 20 to 30 seconds from a safe distance of several inches, but it runs hotter and burns fabric quickly if you linger. An iron should only touch the design in short bursts, never resting in place, and always with a barrier cloth between the iron and the vinyl.
Cotton and cotton-poly blends tolerate all three heat sources reasonably well; for more on fabric handling and safety, see our guide on how to make a T-shirt at home. Pure polyester and anything with spandex or lycra should stick to a hair dryer on low or medium. Skip the iron and heat gun on those fabrics entirely, since heat softens adhesive but overheats synthetic fibers just as easily, causing glazing or melting instead of a clean lift.
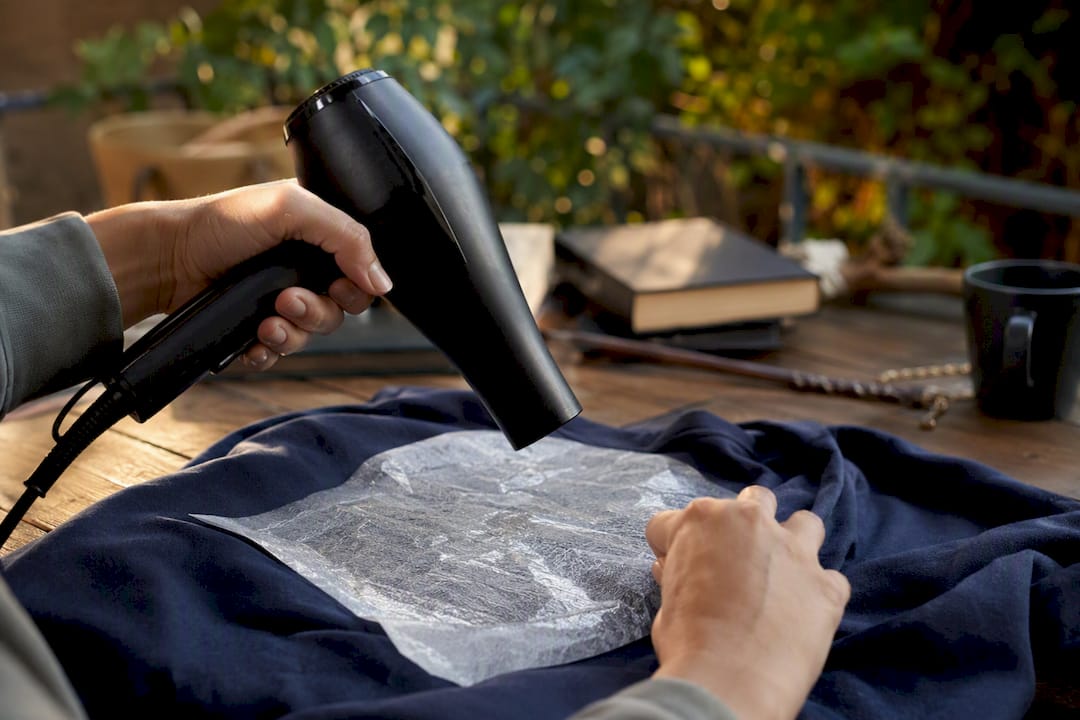
Never use a steam setting during this process. Steam adds moisture that can push dye around and cause blotchy discoloration, especially on darker shirts.
Pro Tip: Peel angle and speed matter more than raw heat. A slow, steady pull at a low angle lifts vinyl in large pieces. Yanking straight up fragments it into tiny bits that take twice as long to clean up.
If the vinyl starts breaking into confetti-sized pieces instead of coming up in one strip, stop. Reheat the remaining section and try lifting a larger area at once rather than chasing fragments one at a time.
What Chemical Removers Actually Work on Vinyl?
Heat doesn’t always finish the job, especially on older or heavily layered designs. That’s where solvents come in, since heat and chemical breakdown are the two mechanisms that actually loosen vinyl adhesive. Here’s how the common options stack up.
Stahls’ Letter Remover (LRV) and AlbaChem VLR are purpose-built for HTV removal. These products are designed to moisten the adhesive from the back of the design so it peels away cleanly, and they’re the standard choice in trade shops handling large or layered transfers.
Goo Gone and other citrus-based removers work well on leftover adhesive residue after the bulk of the vinyl is gone. They’re gentler than acetone and safe on a wider range of fabrics.
It breaks down adhesive gradually without the fumes or fabric risk that come with harsher solvents, which makes it a reasonable starting point before reaching for anything stronger.
Acetone or nail polish remover dissolves vinyl adhesive fast, but it’s cotton-only. It will damage polyester, spandex, nylon, and most tri-blend fabrics on contact, sometimes melting synthetic fibers within seconds.
WD-40 loosens stubborn residue in a pinch, but it leaves an oily film that needs a thorough wash with dish soap or heavy-duty detergent afterward. It’s a last resort, not a first choice.
For each of these, the process is similar:
- Apply a small amount to the back of the design, or directly to the residue if the vinyl itself is already gone.
- Let it sit for a few minutes, per the product’s own instructions.
- Lift softened vinyl with tweezers or a plastic scraper.
- Blot and clean the area, then launder before wearing or re-pressing.
Fabric compatibility is where most mistakes happen. Skip acetone and anything with harsh solvents on polyester, spandex, nylon, and tri-blend shirts, no matter how stubborn the residue looks. A patch test on an inside seam will tell you in under a minute whether a fabric can handle it.
Safety basics: gloves, eye protection if you’re working with a spray, good airflow, and small amounts applied at a time. Dispose of solvent-soaked cloths outside, away from heat sources, since some of these products are flammable. Wash the shirt fully after any chemical treatment, even if it looks clean.
Pro Tip: Professional letter removers like LRV penetrate from the inside out, which tends to produce a cleaner result on large or multi-layer designs than alcohol or Goo Gone alone. If the shirt has real sentimental or resale value and you’ve got decent ventilation, this is worth the extra cost.
Can You Freeze or Scrape Vinyl Off Instead?
Old, brittle HTV sometimes responds better to cold than heat. Vinyl that’s been through years of washing tends to crack rather than peel, and freezing exploits exactly that.
- Seal the shirt in a plastic bag and freeze it for 1 to 2 hours.
- Pull it out and immediately work a fingernail or plastic scraper under an edge while it’s still cold and stiff.
- Crack and lift in small sections rather than trying to remove the whole design in one motion.
For mechanical removal without freezing, warm the area slightly first if the vinyl feels too rigid to budge. Use a weeding tool or tweezers to lift a starting edge, then a plastic scraper or an old credit card to work along the rest. Stick to plastic tools instead of metal blades. A blade cuts fabric fibers just as easily as it cuts vinyl.
Save a craft knife for genuine last-resort cases, and only ever cut into the vinyl, never toward the shirt. Work in small sections, and don’t force a stuck spot. If scraping stalls out, switch to a solvent or a round of heat on that section instead of pushing harder. More force just tears fabric.
How Do You Clean Up Leftover Adhesive Residue?
Getting the vinyl off is only half the job. The sticky residue left behind needs its own cleanup pass before the shirt is wearable again.
- Apply Goo Gone or isopropyl alcohol directly to the sticky spot and let it sit for a minute or two.
- Blot and rub gently with a clean cloth, working from the outside of the spot inward.
- Use a plastic scraper on any residue that’s softened but not fully lifting.
- Wash the shirt with mild detergent once the area feels clean to the touch.
Turn the shirt inside out for washing, and use whatever water temperature the care label recommends. Air-dry when possible, since dryer heat can set any solvent residue that didn’t fully rinse out. An extra rinse cycle helps clear anything a normal wash misses.
If you’re planning to press a new design onto the same spot, wait about 24 hours after solvent use so the fabric has time to fully dry and off-gas. Confirm the area is clean and completely dry, then patch-test the new adhesive before committing to a full press.
If residue is still visible after washing, repeat the solvent treatment once more rather than reaching for a second, stronger product. Mixing solvents without testing first is how people end up with a chemical reaction they didn’t expect.
What Mistakes Ruin a Shirt During Vinyl Removal?
A few patterns show up again and again in vinyl removal gone wrong:
- Melted or glazed fibers after too much heat: stop immediately, let the fabric cool, and assess before doing anything else.
- Discoloration or dye transfer after solvent use: stop, rinse the area, and launder right away rather than applying more product.
- Vinyl shattering into tiny pieces: reheat the remaining section and peel slower, at a lower angle.
Watch for these red flags before you go any further: no lift at all when you try a corner with a fingernail (likely screen print, not vinyl), any color shift during your patch test (stop entirely), or fabric that feels stiff or waxy after heat (that’s often permanent damage).
If something starts going wrong, rinse solvent-treated spots quickly rather than letting the product sit longer than instructed. Favor another round of gentle heat over more aggressive scraping. When a shirt matters and home methods aren’t working, it’s fine to stop and call it done.
When Should You Call In a Professional Instead?
Some jobs aren’t worth the gamble at home. Get professional help if the shirt has real value to you, the design is large or covers multiple layers, you’re already seeing fabric damage, or you’ve tried more than once without success.
Trade shops typically use targeted solvent treatments and controlled heat processes that go beyond what a home iron and a bottle of alcohol can manage. They can often re-press a clean surface or restore a shirt that looked like a lost cause after a DIY attempt.
Weigh the cost against the shirt itself. Professional removal makes sense for a jersey, a band shirt, or anything with sentimental weight. For a $12 basic tee, replacing it is usually the more sensible call than paying someone to salvage it.
What Do Experienced Menders Wish They’d Known Sooner?
Work from the back of the design whenever the garment allows it. Heat and solvent both reach the adhesive layer faster from behind than fighting through the printed top layer.
Keep a steady, even peel force instead of jerking at stubborn spots. Reach for isopropyl alcohol before acetone or anything stronger. It’s slower, but it’s far less likely to leave you with a bleached patch where a logo used to be.
A few patterns hold up across repeated attempts: pulling slowly matters more than cranking the heat higher, and vinyl that’s been pressed for years usually responds better to a solvent soak or a freeze session than to more aggressive heat. For more on keeping printed shirts looking sharp between washes, our t-shirt care guide covers the laundering habits that keep graphics from cracking or fading in the first place.
Why We Recommend the Conservative Approach
At 3wizardclothing, we’d rather see you save a shirt than end up with a bleached patch and a shrug. That’s why every method in this guide runs in the same order: patch test, then heat, then solvent, then mechanical force as a last resort. It’s slower than just grabbing acetone and going for it, but it’s also the sequence least likely to leave you with a ruined garment.
Aggressive solvents and high heat cause damage that can’t be undone. A conservative sequence costs you a few extra minutes and gives the fabric the best possible shot at coming through intact. If you’re working on something with real value to you, our apparel care guide has more on keeping graphics and fabric in good shape long after the original design is gone, and our team’s happy to help if you’re stuck.
Frequently Asked Questions
Can you always remove vinyl from a shirt without damaging it? Most HTV comes off cotton and cotton-blend fabric with heat and a slow peel, but success depends on fabric type, vinyl age, and how it was applied. Older or heavily layered designs sometimes leave faint residue or texture changes even after a careful removal.
How do you remove HTV residue after peeling off the vinyl? Apply isopropyl alcohol or Goo Gone to the sticky area, let it sit briefly, then blot and scrape gently with a plastic tool before washing the shirt with mild detergent.
What’s the best way to peel vinyl off a shirt without ripping it? Apply heat from the back of the fabric, then pull slowly at a shallow angle instead of straight up. A steady, low-angle pull keeps the vinyl in larger pieces and reduces the chance of tearing fabric underneath.
Can you use acetone to remove a vinyl decal from a shirt? Acetone damages polyester, spandex, nylon, and most blended fabrics, so always patch-test on an inside seam first.
Is it possible to remove a screen-printed design the same way as vinyl? No. Screen print is bonded directly into the fabric fibers rather than sitting on top like vinyl, so it won’t lift with heat or peel with tweezers. If a fingernail can’t get under an edge, it’s likely screen print, not HTV.
Sources
Guidance in this article draws on removal methods and safety notes from HTVRont, Pozitive, VoilaStickers, Archute, and the Stahls blog.
Products referenced include Stahls’ Letter Remover (LRV), AlbaChem VLR, Goo Gone, WD-40, isopropyl alcohol, and acetone. Patch-test each one and follow its label instructions before treating a full design. For more care guidance, visit 3wizardclothing.
- How to Remove Heat Transfer Vinyl (HTV) - HTVRont guest post
- How To Remove HTV From Shirt Fabric? - Pozitive
- How to Remove HTV Vinyl - Stahls blog


